12.01.2016

TIS THE SEASON'S HOLIDAY HOSTING & STYLING WORKSHOP


Hi Friends! The holidays are here and in full swing and I am so excited to share all of the fun details for Tis The Season's inaugural Holiday Hosting & Styling Workshop! What is 'Tis The Season' you ask? Well, I am pleased to announce that Tis The Season is the experience and production partner for A Handcrafted Affair's design studio. A collaboration between myself and Megan Habig, Tis The Season is focused on creating unforgettable experiences with an emphasis on custom, handcrafted design. Megan and I are working on the plans for some great upcoming events in 2017 so be sure to join the A Handcrafted Affair newsletter to stay up to date on what's happening in the design studio as well as upcoming events & workshops through Tis The Season! And if you join our newsletter this month, a free gift will be sent to you - a holiday decor style guide with 3 different looks to inspire your holiday style this season.

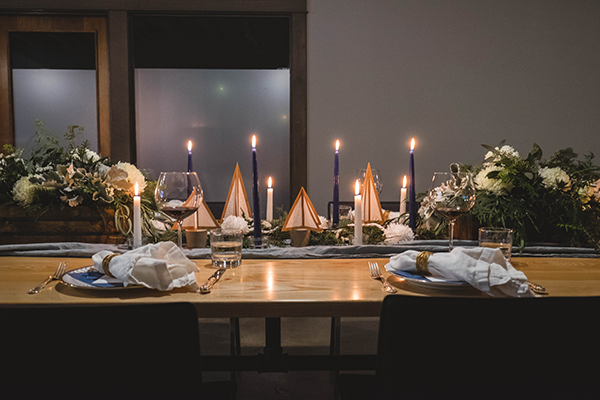
The Holiday Hosting & Styling Workshop took place at The Hatch. Inspired by the stunning simplicity of Nordic design, two unique holiday tablescapes were featured highlighting how easy it can be to achieve two different looks using the same base elements - all of which are executed using simple materials.

The first tablescape was full of holiday warmth. A hand-dyed table runner worked as a base for both tablescapes and helped pull together the warm tones of gold, brown and green accents. Menu cards were placed on top of each place setting and were accented with gold foil. Two wooden crates were arranged next to each other to create one stunning floral centerpiece filled with golden Fuji mums, Yarrow and deep red Hypericum berries. Deep brown and white candles anchored either side of the centerpiece with handcrafted wooden garlands for a finishing touch to create an elegant tablescape.

Kicking the evening off with a glass of prosecco garnished with sugared cranberries to add a holiday feel, guests then enjoyed a four-course food and wine pairing. The first two courses served at the holiday warmth tablescape included a goat cheese crostini paired with a glass of rose and a spinach salad with pears and spiced pecans paired with a beautiful pinot noir.


After the second course, guests took a short intermission to create their own take on a
simple holiday wreath using either a dowel rod or embroidery hoop for a base and adding in greenery, berries, beads and other natural materials.


The dinner party reconvened at the second featured tablescape transformed with a moody blues palette. Handcrafted paper trees sitting on top of DIY concrete pillars paired beautifully with deep blue and white candles to add height to the table. Using the same two wooden crates, two floral arrangements of white Fuji mums, white spray roses and blue thistle were accented by a variety of greenery that helped to tie in the overall holiday feel. Die-cut paper snowflakes were scattered throughout - the negatives of the snowflakes were used as part of the place settings sitting underneath the menu cards. A handmade pom pom garland made from white yarn wove its way through the center of the table tying everything together. Guests then enjoyed the last two courses of the evening which included a crispy chicken confit paired with a glass of temranillo and a gingerbread spiced cake wrapped up the evening's pairings with a glass of moscato.

The oh-so-delicious menu was prepared by Chef Sarah Showalter, a personal chef and caterer, who greeted the guests and spoke about her inspiration and concept behind the menu. World of Wines', Julie Logsdon, also took a few moments to share a few tips about choosing the right wines when pairing with a menu. 


The night was a lot of fun and we couldn't be more pleased with the launch of Tis The Season. Looking forward to 2017 and many more events like this!

Looking to host your own holiday party this year and not sure where to start? Book a complimentary 15 minute consultation with us and see how we can ease the stress of holiday entertaining! Click here to book a call now!

P.S. Don't forget to grab your holiday style guide here!


All images of the Holiday Hosting & Styling Workshop are the copyright of Andrew Parker Images


SaveSave

4.12.2016

Rain Cloud Mobile Tutorial

Photo by Lisa Diederich Photography

Hello! Happy Spring! It's been a hot minute since I last posted a tutorial so I thought I'd dust off the cob webs here on the blog and share all the details for the rain cloud mobiles I made last spring for Suzanne and Trevor's baby shower. I had received so many compliments on these and recently a request on a tutorial so I am happy to share this with you all!

The mobiles are actually very easy to make with a few supplies but do take a bit of time so make sure you have a good movie and a cocktail ready to entertain yourself while you make a gazillion mini fabric tassels.

SUPPLY LIST FOR ONE MOBILE:
  • Cloud Template
  • Pen
  • Scissors
  • White Foam Core (11" X 17" will fit this template size)
  • Mat Knife
  • Glue Gun
  • Approx 2 yards White Muslin Fabric (or any other cotton fabric that tears easily)
  • Approx 1 yard Tulle (I used a light blue tinted tulle but you can use white or any other color)
  • Wire
  • Waxed Linen Cord
  • Felt Pom Poms (assorted sizes/colors)
  • Ribbon
  • Large Eye Embroidery/Tapestry Needle
  • (2) Small Eyelet Hooks

DOWNLOAD THE RAIN CLOUD TEMPLATE HERE

I've created a simple cloud shape you can use as your template for the mobile base. Print out the template and with your scissors cut out the cloud shape. You can then trace it onto the foam core. You will need to trace two foam core clouds. With your mat knife, carefully follow the contour lines of the cloud to cut out the shapes. This doesn't need to be perfect as the foam core will be covered with tassels.

Once you cut the two cloud shapes, you will also need to cut a slit halfway down the center of the clouds so that they can stack together in an "X" formation.

HANDY TIP:  Make sure to cut from the top edge down to the halfway point on the first cloud and then from the bottom edge to the halfway point on the second cloud so that they fit perfectly together.

Your slit should be the same thickness as your foam core. The two clouds should fit together pretty snuggly but if they seem a little loose then just add a line of hot glue down each intersection to secure them in place.


Ok, now that the cloud base is assembled, it's time to make the tiny tassels!

Each of the finished tassels are approx 1.5" in length and are made up of two layers of torn muslin strips and one layer of tulle and tied off with wire. You could use thread or bakers twine to tie them off as well but I found the wire to be much quicker. I wrapped the wire around a couple of times and then twisted the loose ends of the wire together to secure in place.

For both the muslin and tulle, you will need to cut or tear them into 1" wide X 3" high strips.

I love working with muslin and I just find the cheapest yard of it at the local fabric shop for projects like this. And it tears so easily into strips so you have a nice frayed edge for added texture! I had snipped the top edge of the muslin every 1" across the width of the material and ripped away. Once I had all my strips torn then I stacked them together and cut them down into 3" lengths.

Same steps for the tulle except you will need to cut the long strips rather than tear them. For my mobile, I used a light blue tulle and it gives the most subtle hint of color to the clouds! You could use regular white tulle or even another subtle color like pink or a soft orange to add a little warmth to your clouds.

To assemble the tassels, layer two pieces of the muslin with one piece of the tulle, fold in half and secure with the wire. It doesn't really matter the order in which you layer the muslin and tulle. I varied mine so that some tassels had the tulle on the outside layer (when folded) and some had the muslin on the outside layer. I really loved the variation in texture as I glued each of these tassels to the cloud base.


Once you are done making tiny tassels it's time to glue them on! I started with the outside edge and worked my way around each half panel keeping consistent in the direction and curves of the cloud. I left about a half inch overhang on the outer row so that it would hide the foam core edge. Continue to overlap the tassels working towards the center axis and then move onto the next panel and continue in the same pattern.


Ok, time for the rain! I purchased my felt pom poms through Benzie Design and they have an assortment of colors and sizes to choose from. I tried making my own and quickly gave up after the first pom pom. After making a gazillion tassels I just didn't have the patience to needle felt wool into little balls plus Benzie's looked WAY better and ten times more compact than mine!

I will say that I did find it helpful to map out the pattern of pom poms before I strung them up but you can also wing it and just let your instinct decide the pattern of rain drops. In the end, I created a total of 5 strands all varying in pattern.

I also used waxed linen cord to string up the pom poms. I read somewhere that the wax helps hold the pom pom in place (which I found it does) but these pom poms are so tightly fused that any string or twine could possibly work just as well. Might be something to experiment with!


Next step is to attach the rain drop strands. I started with the center strand and it attaches to the cloud with one of the little eyelet hooks. With the hot glue gun, add a dab of glue onto the tip of your eyelet hook and push it into the very center bottom edge of the cloud (where the two cloud panels intersect). You can then tie the center rain drop strand to this hook.

For the four remaining strands, use your tapestry (or large eye needle) to puncture through the foam core and string each strand through the four bottom curves of the cloud base. Tie off the strands at the desired length and trim any excess cord.


To hang the mobile, you will use the other small eyelet hook and add a dab of glue onto the tip of it and push it into the very center top edge of the cloud (where the two cloud panels intersect). Loop ribbon through the hook and tie it off and your mobile is ready to hang!

Photo by Lisa Diederich Photography

This is definitely one of my favorite projects and I would love to see any cloud mobiles you all make! If you happen to make one be sure to share a pic with me and I will share your creation on my FB and IG feeds!!

Have a great week!


10.08.2015

My AHA Moment >> A Handcrafted Affair's First Blog Feature!

Hi there! I am super excited today as A Handcrafted Affair just received it's first blog feature so I just had to tell you all about it! Little Peanut Magazine is featuring the Whimsical Woodland Tea Party on their blog that I had the pleasure of collaborating with Anissa from House Seven Design and Abby from Maeve Vintage Rentals.

Anissa and I have been friends for about 15 years and she recently introduced me to Abby which was a perfect match for collaborating as we all share a passion for living creatively. It was so great to work with both of them and to be able to include our kiddos in the shoot made it even more special.

I had so much fun creating the headpieces which were made from crepe paper, felted wool and wooden twigs. And if you recall, I like to try my hand at the occasional face painting and these lil' girls were loving it too!

Abby's vintage setting from her "Little Maeve" rental collection was perfect and I loved all of her little touches of detail.

Huge thanks to Anissa for being photographer for the day. It was pouring rain that day but we were determined to stick it out and finally the rain let up for about 30 min which Anissa did a great job of directing and getting in the shots before it down-poured on us again.

It was also pretty comical as the girls were eating all of our props before we had even wrapped the shoot. I don't blame them, the macarons were pretty yummy!

Here's a few behind the scene pics but be sure to head over to Little Peanut's blog for the full feature!


And here's just a little collection of teaser images from my Instagram feed....


Well, the weekend is almost here so thank goodness for that! I'm finishing up some sugar flowers for a wedding cake this weekend so I will be sure to share it with you all soon!


8.05.2015

A PINEAPPLE PARTY FOR RILEY'S SECOND BIRTHDAY

Hello! Today I am finally sharing with you the Pineapple party for my sweet lil' Riley's second birthday! Riley has such a fun and (already) wild personality that this pineapple theme was pretty fitting for her. 

I had put together a mood board a few weeks ago so if you missed that you can check it out here. I always find that putting together a mood board or even just collecting images on a Pinterest board is super helpful in staying on point with the overall theme and look of your party. I definitely was going for bright summer colors along with gold accents for this pineapple theme.


Oh, and this cake! I am pretty happy with how it turned out. I had this idea to mimic the pineapple texture on the cake so I simplified it down to a diamond pattern by creating a template with my Cricut Explorer and then pressed sprinkles into the diamond cut-outs to create the pattern. 

For the topper, I had gotten the idea to spray paint the tops from here and thought it would also make the perfect adornment for my pineapple-inspired cake.

The cake itself was a white confetti cake with a pineapple curd swiss meringue buttercream (you know I had to work pineapple in there somewhere!). I will have to do a follow up and post the recipes and the diamond pattern template for you all so keep an eye out for that to come soon!

The paper honeycombs were a perfect accent to this pineapple theme. They came in packs of 12 and I purchased two colors (yellow and dusty rose) in the 8" diameter and two colors (light blue and gold) in the 5" diameter. I tied them in bunches of 3 and 4 honeycombs and accented them with faux tropical leaves. Using fishing line, I strung up the bunches and hung them from the ceiling. For the honeycombs on the wall, I totally used pushpins (it's what I had handy but if you do not want tiny holes in your wall then you could use some super strong tape or even little Command hooks).

I also re-created the pineapple pops from my mood board and you can find the recipe here. Those are treats that I will definitely make again! Super easy and pretty yummy!

For the DIY pineapple flower vases, I created my flower arrangements in ball jars and then cored my pineapple out so that the ball jar could sit inside of it. This is something you want to do either the day before or even the day of the party as it doesn't have a very long shelf life (and starts attracting those pesky little fruit flies!). I spray painted them gold and set the flower jars inside for a quick and easy DIY decoration.

I purchased the pineapple-shaped cups from Party City along with the giant #2 gold mylar balloon. The plates, napkins, forks and paper straws are all from Target and I found the fabric for the table runner at Jo-Ann's Fabric and Craft Store.

Every kiddo's birthday party should have at least one fun party game! So, we played Pin the Pineapple Top which was a pineapple-themed version to the classic Pin the Tail on the Donkey. 

I couldn't find a game that already existed so I covered poster board with pink wrapping paper and used my Cricut Explorer to cut out the letters and the pineapple tops. I printed the pineapple head and glasses on an 11" X 17" sheet of paper and just ended up cutting that out by hand. 


It was just a small party with family and a couple of friends and I know Riley had a blast that day. She's quite the lil' party girl! She's still running around here singing Happy Birthday, haha!

Well, hope you all are enjoying the rest of your summer! My oldest, Mia, starts kindergarten next week so that's our next exciting moment around here. And then we are off to Colorado for a wedding. August is going to be a busy month! 


7.21.2015

DIY PARTY GARLAND

Hi! I can't believe it is already the middle of July. Weren't we just celebrating the fourth of July? This month is full of celebrations. The Hubby's birthday was on Sunday, my lil one is turning two tomorrow and my good friends, Suzanne and Trevor, just became parents last week! Their Surrogate, Kelly, just delivered two healthy, precious boys and I am super excited to meet them! 

Suzanne and I work together at the ad agency and we threw her the "work" baby shower just in the nick of time before they headed down to Texas to be with Kelly during the delivery.

I (of course) helped out with decorating the party but with a pretty busy schedule this month I wanted to make something that would "come together" in like an hour so I hopped over to Party City and bought a few decorations that I knew would easily go together to make a cute DIY garland.

I failed at getting any great pictures of it at the party but I brought it home and my oldest thought it would be fun to stage our own little party. Which was a great idea because now I can share a simple DIY tutorial with you!


HERE IS WHAT YOU NEED:


The assembly is super simple. The pom pom garland comes in a pack of two so you could either tie them together to make a 24' garland, or make two separate ones, or you could do like I did and use the second one for another decoration.

First, stretch out the pom pom garland on the floor and begin to unfold and fluff each of the individual pom poms. You will be assembling the fans and balloons in between pairs of the pom poms. 

Next, you will blow up and attach your balloons with the ribbon. I alternated the pattern of the balloons in between each pair of pom poms - white, silver / silver, white / white, silver ....

After you attach the balloons you will then unfold each of the tissue fans and tie them to the garland strand in between the white and silver balloons. Once you have them secured you can then push the balloons closer to the tissue fan to create a little trio of decorations in between the pom poms.

To make a fuller garland, you could add in additional balloons or fans but I kept mine with a little more space in between each of the decoration "trios" and the pom poms and then just closed up some of the gaps when I taped it to the wall with the scotch tape. Super simple and super cute!

And of course I have to share some of my favorite behind the scenes shots of the girls setting up for their own little party. I love seeing them "be like momma." Makes my heart melt!


Like I said, tomorrow is the lil one's second birthday and we are hosting her pineapple party on Sunday so I can't wait to share all the deets with you!

Have a great week!


6.26.2015

LET THEM EAT CAKE

Happy Friday! Where did this week go? I'm a little late on this week's blog post so sorry for that, but here it is! We are gonna talk about cakes...and not just any cakes but some of the most gorgeous cakes I've ever seen.

So, the other day I was chatting with a friend who is getting married and we were talking through all the fun details of her wedding and I sent her some of my favorite cake artists...and they are definitely artists! As I was pulling links to each of their websites I totally started SWOONING over these beautiful creations. These are too good not to share with you all!

Image via Maggie Austin
Maggie Austin - She has to be my most favorite cake artist. I could probably do a whole blog post on all of her cakes and it was too hard to just narrow it down to just one example to share with you. I'm simply captivated by her haute couture style and every attention to detail. I'm just in awe over the hand painted stained glass and the fondant ruffles. And those sugar flowers! Stunning!


Image via Cake Ink
Cake Ink - Creators Janelle (cake) and Samone (ink) specialize in custom handmade cakes and stationery so not only can they create you a stunning cake but they can also whip up some beautiful stationery to go with it...two of my favorite things! And I am obsessed with gold leaf cakes right now so it's on the top of my list of things I must try myself in one of my own little cake designs.


Image via The Caketress
The Caketress - This beauty is from Lori Hutchinson's Runway Inspired Collection and the design was inspired by Valentino's Pastel Rockstud shoes and purses. What a wonderful cake for the fashionista at heart!


Image via Cake Whisperer
Cake Whisperer - I feel like I just stepped into an enchanted garden when I see this cake. What beautiful sugar work and of course I love the gold marbling on the bottom tier!


Image via Sweet Bakes
Sweet Bakes - I love when cake artists pull inspiration from other materials such as this gorgeous marble fondant cake. So elegant!


Image via Sweet Sugar Boy Ed
Sweet Sugar Boy Ed - I love rainbows. I love sprinkles. And I love sugar flowers inspired by rainbows!


Image via Unbirthday
Unbirthday - Nikki Lee creates some of the most bold and fabulous cakes! Her cakes are styled with a signature chocolate crown and she offers cakes that can be adorned with macaroons, candy confections, candy bars, gold-dusted cherries, swiss meringues, caramel popcorn, fresh fruit and edible flowers. It's an entire dessert bar in one brilliant display!


Image via Broken Tart
Broken Tart - Not all cakes need to be covered in fondant and gold leaf or sugar flowers to be breathtaking. I love the cake designs by Broken Tart for their natural and raw but yet elegant style. I've heard wonderful things about their cake flavors and they are located in Chicago which is only a few hours from me. Next time I'm in the city I HAVE to go for a visit and taste-test their beautiful cakes myself!


Alright, who's ready for cake?! I hope you've enjoyed some of my favorite cake inspirations this week and next week on the blog I think I will post a little fun cocktail recipe in honor of the upcoming Fourth of July holiday. Talk to you all next week!


Related Posts Plugin for WordPress, Blogger...